
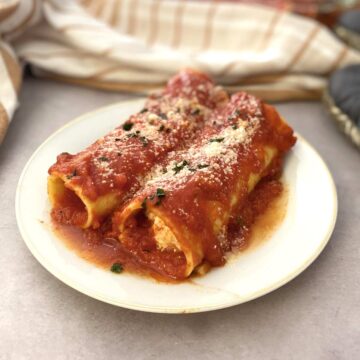
This recipe for homemade Cheese Manicotti will not disappoint you or your loved ones. Also known as Cannelloni al Forno, made with fresh pasta, ricotta, eggs and fresh tomato sauce, this recipe for cannelloni will be a winner any night of the week or the weekend.
Cannelloni vs. Manicotti
What's the difference between Cannelloni vs. Manicotti? Two different words that literally mean the same thing. Traditionally manicotti have ridges while cannelloni are slightly thinner and smooth. But the difference is very minimal.

Jump to:
- Cannelloni vs. Manicotti
- Why You'll Love this Dish
- What to Serve with Homemade Cannelloni
- Make the Tomato Sauce in Advance
- Do You Have to Cook the Pasta before making Manicotti or Cannelloni?
- Ingredients You'll Need
- What Goes into the Filling for Cheese Manicotti?
- How to Make Homemade Cheese Manicotti
- Meal Prep Tips
- Possible Ingredient Substitutions
- Equipment
- Storage
- Answers to Common Questions
- More Main Dishes You'll Love
- Recipe Details
- PIN for Later
- Food Safety
- Comments
Why You'll Love this Dish
Homemade cannelloni al forno is also known as manicotti. You'll love homemade cannelloni because:
Easy to make - homemade cannelloni are easy to make and can be oven ready in 20 minutes.
Versatile - you can customize the filling and use vegan cheese, chicken or beef.
Impressive - while they are easy to make, they'll make it look like you spent hours int he kitchen.
Family and Kid Friendly - even the pickiest of eaters will like homemade cheese cannelloni.
What to Serve with Homemade Cannelloni
Homemade cheese cannelloni al forno is a dish on it's own, but if you want to serve it with something try:
- Grilled vegetables with a balsamic vinaigrette
- Arugula Salad with Goat Cheese, Pears and prosciutto
- Simple Charcuterie Board
- Spinach Salad with Strawberry Dressing
- Mini Chocolate Trifles made with Cake and Cream Cheese Frosting
Make the Tomato Sauce in Advance
Make your tomato sauce ahead of time. This will save you time. Once you have your sauce ready, assembling the remaining ingredients and rolling the pasta into cheese manicotti will take you 20 minutes.
For this recipe, I used whole canned tomatoes. But, you can use crushed tomatoes or tomato puree. I just find the texture of the tomato sauce goes very well for this cheese manicotti recipe.
But you're not done yet. Keep scrolling down and read on. Don't forget you'll need to bake the cannelloni for at least 40 minutes before you can serve them.
This page contains affiliate links, which means I may receive commissions if you choose to purchase through links I provide (at no extra cost to you). Thank you for supporting the work I put into this site! As an Amazon Associate I earn from qualifying purchases.
Do You Have to Cook the Pasta before making Manicotti or Cannelloni?
This is also a good question and some people get it wrong. Cheese Manicotti are delicate but not hard to make. Just remember that if the pasta is hard it will need to be pre-cooked. You may be able to find oven ready pasta shells, but they usually end up tasting "chalky".
It's best not to skip corners for making these cannelloni and just par-boil store bought pasta that's hard. Here is a simple guide that will help you decide what to buy and whether you need to par-boil your pasta in preparation for stuffing them with your ricotta cheese filling.
- Manicotti Shells - Manicotti shells -usually need to be cooked for about 7 minutes. You should take them out of the water and put them in a ice water bath when they are about mid-way cooked. Then you can stuff them and put them on a baking sheet and complete the cooking process in the oven. Barilla has manicotti shells and they are easy to use and work well.
- Home Made Lasagna Sheets - nothing beats home made lasagna. If you have the time, homemade is always better. With fresh homemade lasagna, you don't need to blanche the pasta because it is very tender and pliable. Just use as needed whether you are making lasagna, manicotti or cannelloni.
- Conchiglioni (Large) Pasta Shells - Large pasta shells also usually need to be cooked for about 9 minutes. You should take them out of the water and put them in a ice water bath when they are about mid-way cooked. Then you can stuff them and put them on a baking sheet and complete the cooking process in the oven. Barilla has large pasta shells.
- Pre-made Fresh Lasagna Sheets - It should come as no surprise that this is my favorite option and my go to for making these homemade cannelloni. That's because it is less laborious than the other three options listed above. You can buy fresh lasagna sheets virtually anywhere and one lasagna sheet normally yields two (2) manicotti/cannelloni. You can use fresh lasagna without pre-cooking it because normally you use it to make lasagna and you lay it flat then bake it. They can go straight to the oven from package which is a win - win!
*Note: I have never par-boiled "oven ready pasta", so I can't give any advice in this regard. I have used it before to make lasagna, and depending on what brand you buy, it may have a bite or taste "chalky".
For these cheese manicotti I did decide to use store bought lasagna sheets.
Ingredients You'll Need
You will need the following ingredients to make homemade cheese manicotti: olive oil, garlic, butter, tomato puree, herbs, seasoning, ricotta, parmesan cheese, egg, lasagna sheets.
Pre-made lasagna sheets are perfect for this dish because they will save you time from making your own and taste just as good.
Ricotta cheese is the perfect soft unripened cheese to use as a pasta filling because it is mild in flavor.
Egg is used to bind your ingredients together and keep it from falling apart during the cooking process.
Parmesan cheese adds a salty kick to your filling, one you won't be able to resist.
What Goes into the Filling for Cheese Manicotti?
These two cheese manicotti recipe can easily be turned into a three cheese recipe by adding mozzarella with the parmesan and ricotta cheese. You could also add spinach to add a little bit of hidden veggies to your manicotti.
But, if this is your first time making manicotti - stick to the recipe. You'll be pleasantly surprised at how simple is sometimes better! Then the next time, you can put your own spin on this recipe and make it your own.
How to Make Homemade Cheese Manicotti
In a medium saucepan heat oil and sauté garlic until fragrent.
Add the tomato puree and bring to a boil. Add seasoning and basil leaves.
Lower the temperature and simmer for 20 minutes. Taste the sauce, if it is tart add sugar as an option to remove the acidity. Continue to simmer for another 15 minutes. Remove from heat.
Prepare your baking dish by greasing it with olive oil. Add half a cup of water and some of the sauce at a ratio of 3:1 water to sauce. Reserve the rest of the sauce to pour over the manicotti at the end.

Prepare your baking dish by greasing it with olive oil. Add half a cup of water and some of the sauce at a ratio of 3:1 water to sauce. Reserve the rest of the sauce to pour over the manicotti at the end.
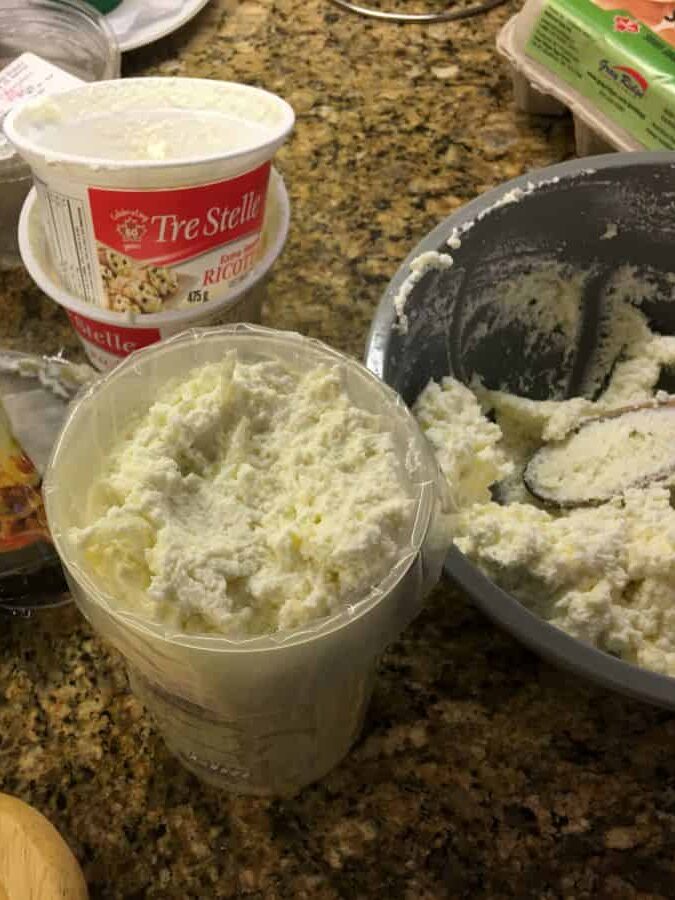
Combine all the ingredients for the cheese filling and mix well.
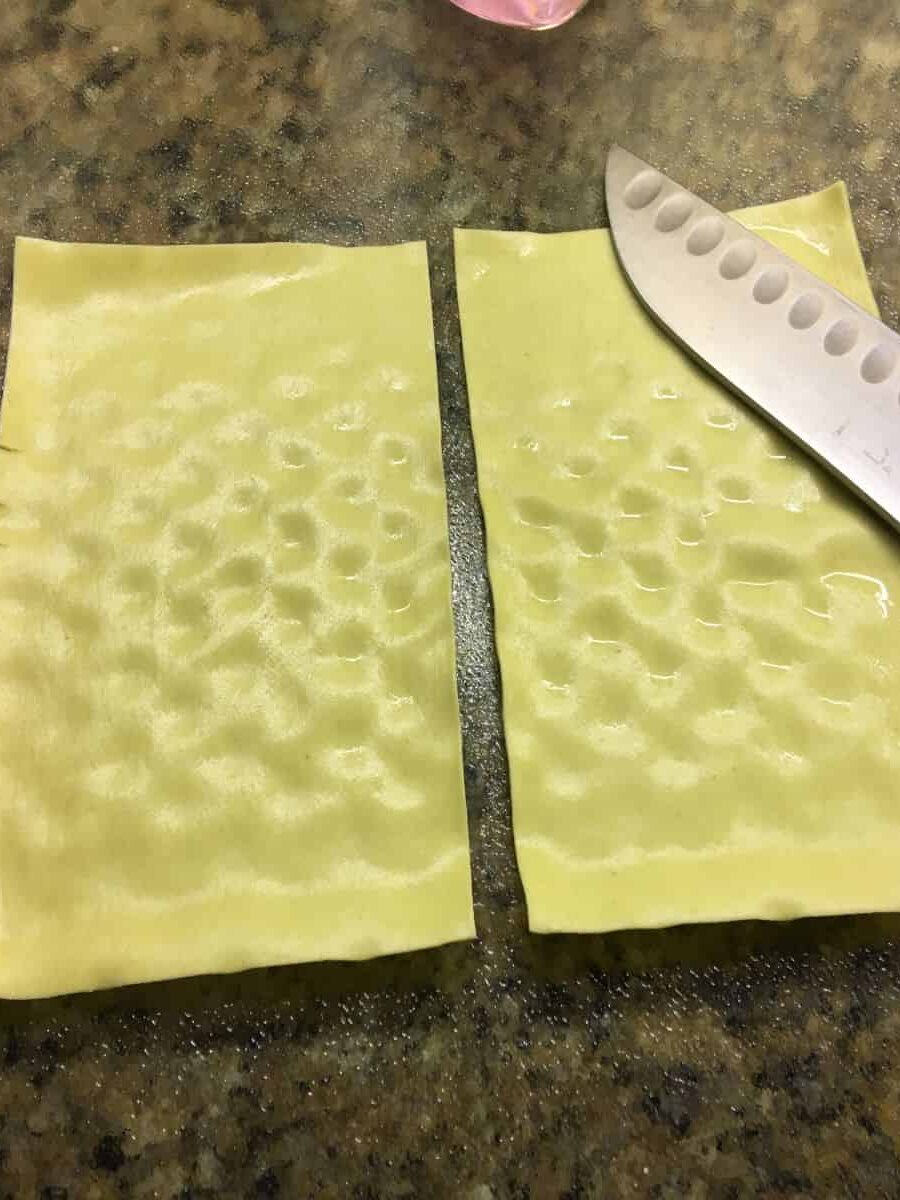
Cut the lasagna sheet in half on the long side.

Using a spoon, place cheese filling on the lasagna sheet close to the edge.

Fold over and roll the lasagna sheet trying to stop any filling from escaping as you roll. Place the cannelloni in the baking dish on top of the sauce, water, oil combo with the slit side down.

Place the cannelloni in the baking dish on top of the sauce, water, oil combo with the slit side down. Repeat until you have either run out of lasagna sheets or cheese filling.
Pour the reserved tomato sauce over the cannelloni. Optional: top with mozzarella or cheese.
Ensure that there is sufficient sauce/liquid to cook the cannelloni. The cannelloni should almost be submerged in the sauce. Without sufficient liquid they will dry out.
Cover with foil and place in over for 40 minutes.
Check at 30 minutes and add more water if necessary to avoid cannelloni from sticking to bottom of pan and burning.
You will know that they are done when the liquid in the dish is boiling rapidly.
Remove from oven and let stand for 10 minutes before serving.
Meal Prep Tips
A glass baking dish or an aluminum roasting pan probably works best for baking these cannelloni. Before you place any cannelloni in your baking dish, you will want to prepare the dish for your pillows of cheese filled roll-ups.
Remember that your pasta isn't fully cooked and that the cooking process is going to finish in the oven. So you will need to prepare your baking dish by placing a combination of water and some of the tomato sauce you prepared earlier.
Use a ratio of 3:1 water to sauce. You will want to ensure that the liquid comes up ¾ inches from the bottom of the pan.
You will also want to place 2 to 3 tablespoons of oil in the bottom of the pan so that the cannelloni don't stick to the bottom of the pan.
Possible Ingredient Substitutions
- Three Cheese Manicotti - add mozzarella to make a three cheese manicotti
- Spinach - add some greens like spinach to make this a vegetable spinach and cheese manicotti
- Gluten Free - use gluten free pasta to make this gluten free
- Spice - add red pepper flakes to the tomato sauce to spice things up.
- Dairy Free - use dairy free cheese to make a dairy free filling.
The perfect recipe isn't that far away. I'd love to know how adapted this recipe for your family or friends. Drop a comment below and let me know!
Equipment
A glass baking dish or an aluminum roasting pan probably works best for baking these cannelloni.
Equipment can have a big impact on how a recipe turns out. Use a large sauté pan that's big enough to hold the sauce, veal meatballs and spaghetti. Wooden spoons, measuring cups and spoons will come in handy as well.
Storage
Any leftovers should be stored in the fridge in an airtight container for not more than 3-4 days.
Reheat leftovers in the microwave.
You can also freeze excess leftovers. Thaw out in the refrigerator overnight and warm in a fry pan for best results.
Answers to Common Questions
You can use a variety of pasta shapes to make cheese manicotti or a variation. Pasta like, pasta shells, pre made cannelloni shells, pre made lasagna sheets or you can make your own lasagna sheets.
Cheese Manicotti are delicate but not hard to make. Just remember that if the pasta is hard it will need to be pre-cooked. You may be able to find oven ready pasta shells, but they usually end up tasting like cardboard. Pre made lasagna sheets are the best option for making manicotti without having to pre-cook your pasta.
Cheese manicotti are usually filled with cheese like, parmesan cheese, romano cheese, ricotta, mozzarella, cream cheese, mascarpone cheese or any combination. Egg binds the ingredients together. Sometimes a small amount of breadcrumbs are used to absorb excess moisture.
More Main Dishes You'll Love


Recipe Details
Cheese Manicotti
https://easyhomemaderecipes.caAffiliate Disclosure
This page contains affiliate links, which means I may receive commissions if you choose to purchase through links I provide (at no extra cost to you). Thank you for supporting the work I put into this site! As an Amazon Associate I earn from qualifying purchases.
Ingredients
Sauce
- 2 tbsp olive oil
- 1 clove garlic
- 750 ml tomato puree
- 1 tsp Italian seasoning
- 1 tsp sugar optional, see note*
- salt and pepper
- 3 fresh basil leaves
Cheese Filling
- 700 g Ricotta
- ½ cup parmesan cheese
- 1 egg
- ½ tsp salt
- pepper to taste
- 2 tbsp breadcrumbs
Pasta
- 350 g fresh lasagna sheets about 5 to 6 large sheets, cut in half
Other
- 2 tbsp olive oil for bottom of baking dish
Instructions
Sauce
- In a medium saucepan heat oil and sauté garlic until fragrent.
- Add the tomato puree and bring to a boil. Add seasoning and basil leaves.
- Lower the temperature and simmer for 20 minutes. Taste the sauce, if it is tart add sugar as an option to remove the acidity. Continue to simmer for another 15 minutes. Remove from heat.
- Prepare your baking dish by greasing it with olive oil. Add half a cup of water and some of the sauce at a ratio of 3:1 water to sauce. Reserve the rest of the sauce to pour over the manicotti at the end.
Cheese Filling
- Combine all ingredients for cheese filling in a bowl and mix well.
Lasagna Sheets and Assembly
- Preheat oven to 350°F.
- Cut the lasagna sheet in half on the long side.
- Using a spoon, place cheese filling on the lasagna sheet close to the edge. Fold over and roll the lasagna sheet trying to stop any filling from escaping as you roll.
- Place the cannelloni in the baking dish on top of the sauce, water, oil combo with the slit side down. Repeat until you have either run out of lasagna sheets or cheese filling.
- Pour the reserved tomato sauce over the cannelloni. Optional: top with mozzarella or cheese.
- Ensure that there is sufficient sauce/liquid to cook the cannelloni. The cannelloni should almost be submerged in the sauce. Without sufficient liquid they will dry out.
- Cover with foil and place in over for 40 minutes.
- Check at 30 minutes and add more water if necessary to avoid cannelloni from sticking to bottom of pan and burning.
- You will know that they are done when the liquid in the dish is boiling rapidly.
- Remove from oven and let stand for 10 minutes before serving.
Notes
Nutrition
PIN for Later

Food Safety
Note that the storage guidelines provided on this page and site are estimates from personal experiences. We are all adults and as an adult you are responsible to ensure that the food you eat is safe to eat. Since, I'm not a food safety expert, you are responsible to review your local guidelines on food storage prior to storing any food left-overs.
Remember to:
- Not use the same utensils on cooked food, that previously touched raw meat
- Wash hands after touching raw meat
- Don't leave food sitting out at room temperature for extended periods
- Never leave cooking food unattended
- Use oils with high smoking point to avoid harmful compounds
- Always have good ventilation when using a gas stove
For Canadian Guidelines check the Government of Canada Food Safety Guidelines or see more guidelines at USDA.gov.

NANCY says
yummy. This comfy dish will be perfect for a rainy night!
Vijitha says
This manicotti looks absolutely delicious! I have all the ingredients in my pantry, so I think I'll be making it this weekend! Thanks for all the step-by-step instructions and pictures!
Sharon says
I have never had homemade manicotti before and I am so glad I tried this recipe. It was way easier than I thought and tasted lovely. We paired it up with a big salad and some roasted veggies. Thanks for sharing the step by step images - very useful for my first time making this dish.
Vanessa says
What a fantastic idea to use fresh lasagna sheets! Great recipe with lots of helpful tips.
Cindy Mom the Lunch Lady says
Your post is making me so hungry! Manicotti is one of my favourite pasta dishes.
Loreto and Nicoletta Nardelli says
Cannelloni is one of those comfort foods that, if you're Italian, you've had countless times and they remind you of family time and treasured moments. Love how you gave people different choices for pasta, and great tips. It looks amazing and I'm sure it tastes the same.