
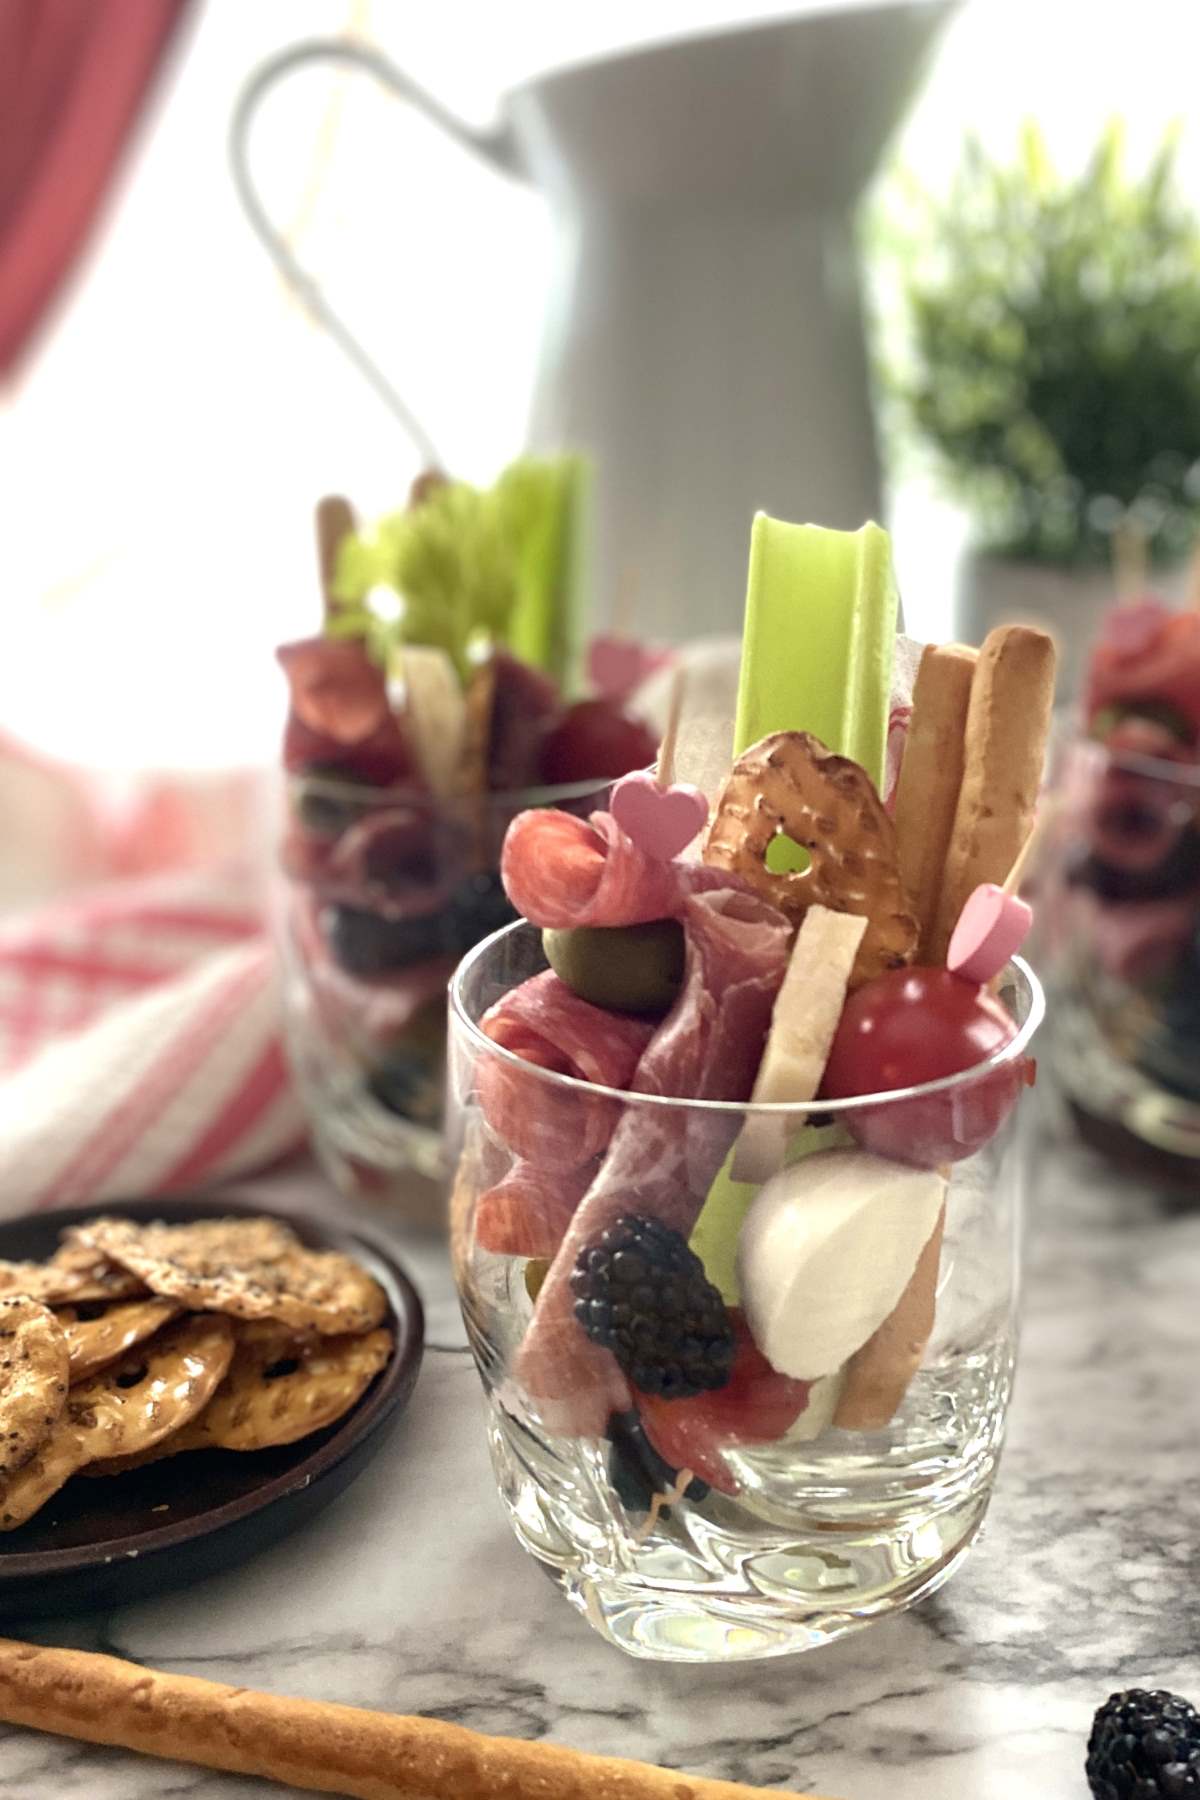
Individual Charcuterie Cups are the ultimate indulgence for food lovers! Imagine a miniature masterpiece of carefully selected cured meats, artisanal cheeses, and an array of mouthwatering accompaniments, all elegantly arranged in a single-serving cup.
Serve these single serving charcuterie cups with homemade hummus, garlic sticks made from puff pastry or a tangy strawberry vodka lemonade.
Jump to:
- Here's Why You'll Love these Single Serve Charcuterie Cups
- Ingredients You'll Need to Make Individual Charcuterie Cups
- How to Make Mini Individual Charcuterie Cups
- Possible Variations and Substitutions
- Meal Prep Tips
- Equipment
- Storage
- Answers to Commonly Asked Questions
- Other Appetizers You'll Love
- Recipe Details
- PIN it for later here
- Food Safety
- Comments
Guests can mingle, socialize, and savor their charcuterie experience without the need for additional plates or cutlery, promoting a relaxed and sociable atmosphere. The convenience factor also makes clean-up a breeze, saving you time and effort at the end of your gathering.
For the full experience build the perfect charcuterie board with 6 simple steps.
This page contains affiliate links, which means I may receive commissions if you choose to purchase through links I provide (at no extra cost to you). Thank you for supporting the work I put into this site! As an Amazon Associate I earn from qualifying purchases.
Here's Why You'll Love these Single Serve Charcuterie Cups
Mini charcuterie cups are the perfect appetizer whether you are organizing a get together at home or bringing a dish to a pot luck! But here are some other reasons you'll love individual charcuterie cups:
- Perfect Portion Control: Mini charcuterie cups provide a convenient and visually appealing way to control portion sizes.
- Customizable Options: Allows for endless creativity and customization. You can cater to various dietary preferences and restrictions by including a diverse selection of cured meats, cheeses (including vegan alternatives), fruits, nuts, and spreads.
- Easy to Serve: Mini charcuterie cups offer hassle-free serving and effortless enjoyment. Unlike traditional charcuterie boards that require utensils and can be challenging to navigate, these individual cups are designed for easy pick-up and bite-sized enjoyment.
- Easy Clean Up - using recyclable packaging, you can make clean up easy. Add charcuterie storage bags for easy storage prior to use.
Looking for finger foods for game day hosting? Check out my collection of Finger Food Recipes to make for your next get together.
Ingredients You'll Need to Make Individual Charcuterie Cups
You will need the following ingredients to make mini antipasto cups: cured meats/salamis, cheese, berries, vegetables and crackers.
Cured meats are one of the main ingredients if you are making a charcuterie board because they are savory and pack a salty punch. Select cured meats like salami and prosciutto.
Cheeses add a another savory flare to charcuterie cups. Any combination will work whether it's soft and mild like bocconcini or hard and medium like parmesan. Cubes of cheddar work as well.
Vegetables add a healthy crunch.
Fruit add a sweet bite to offset the salty flavors of the meats and cheese.
Crackers and breads serve as a great carrier for the cheese and cured meats.
Olives add a Mediterranean influence and add texture to your charcuterie.
See recipe card for full list of ingredients and quantities.
How to Make Mini Individual Charcuterie Cups
Have all your ingredients ready in front of you when you make your individual charcuterie cups so that you don't forget to add an ingredient to your cups.

Wash and cut your celery stalks. Cut them so that they come up about 2 inches from the rim of the glass.

Place your bocconcini on skewers alternating with the grape tomatoes. If your bocconcini are too big, cut them in half.

Roll the salami and prosciutto. Place them on skewers alternating between olives.

Cut the cheese and breadsticks. Make sure that the breadsticks come up about 2 inches from the rim of the glass. You can also use charcuterie board crackers like wafer crackers.
Place the celery and the breadsticks in your glass first. You can place a few berries in the bottom if you wish.
Then place the skewers in the glass, one at each end if possible. Filling the space with other ingredients. Refrigerate until ready to serve.
Possible Variations and Substitutions
While charcuterie is primarily meat based, you can tailor these mini appetizer cups to suit any diet. Here are some great options.
- Vegan Charcuterie Cups - instead of ice berg lettuce, you can use romaine lettuce or spinach
- Gluten Free Bread - use gluten free bread for your charcturie board crackers to make it gluten free.
- Dairy Free - select dairy free cheeses to add to your appetizer cups to make it dairy free antipasto cups.
- Fruit Charcuterie - skip the deli meats and add more fruit and a touch of chocolate for a fruity charcuterie cup.
The perfect recipe isn't that far away. I'd love to know how you substituted ingredients to fit your dietary needs. Drop a comment below and let me know!
Meal Prep Tips
If you don't think that you will use your antipasto cups the same day, store them by placing plastic wrap over each cup or by placing them in charcuterie cup bags.
Equipment
You'll need cups either made of glass or disposable cups, bags and bamboo skewers.
A cutting board and knives will also come in handy to cut vegetables, cheese and other ingredients.
Storage
I don't recommend storing these longer than 12 hours. Once made they need to be consumed the same day. If you need to store them, cover with plastic wrap or use charcuterie cup dust bags.
These ingredients don't stand up well to freezing.
Answers to Commonly Asked Questions
If you like, you can place, berries, nuts or seeds in the bottom of a charcuterie cup or antipasto cup.
Yes, you can make charcuterie cups ahead of time, but you should consume them the same day to prevent salamis or soft cheeses or any other ingredients from drying out
To keep charcuterie cups fresh, store them in a charcuterie cup dust bag or cover them with plastic wrap.
The 3 3 3 3 rule simply means that when you are creating your charcuterie, do select 3 meats, 3 cheeses, 3 starches, and 3 accompaniments.
Other Appetizers You'll Love


Recipe Details

Individual Charcuterie Cups
https://easyhomemaderecipes.caAffiliate Disclosure
This page contains affiliate links, which means I may receive commissions if you choose to purchase through links I provide (at no extra cost to you). Thank you for supporting the work I put into this site! As an Amazon Associate I earn from qualifying purchases.
Ingredients
- 1 Celery Heart
- 150 g Salami Genoa Salami
- 200 g Prosciutto
- 200 g pecorino romano cheese or you can sub Parmiggiano Reggiano or Cheddar
- 100 g Bocconcini small
- 125 g Breadsticks or crackers
- 200 g Pretzels or crackers
- 200 ml Olives pitted
- 170 g Berries
- 280 g Grape Tomatoes
Instructions
- Wash and cut your celery stalks. Cut them so that they come up about 2 inches from the rim of the glass.
- Place your bocconcini on skewers alternating with the grape tomatoes. If your bocconcini are too big, cut them in half.
- Roll the salami and prosciutto. Place them on skewers alternating between olives.
- Cut the cheese and breadsticks. Make sure that the breadsticks come up about 2 inches from the rim of the glass.
- Place the celery and the breadsticks in your glass first. You can place a few berries in the bottom if you wish.
- Then place the skewers in the glass, one at each end if possible. Filling the space with other ingredients.
- Consume the same day, store in refrigerator until served.
Nutrition
PIN it for later here

Food Safety
Note that the storage guidelines provided on this page and site are estimates from personal experiences. We are all adults and as an adult you are responsible to ensure that the food you eat is safe to eat. Since, I'm not a food safety expert, you are responsible to review your local guidelines on food storage prior to storing any food left-overs.
Remember to:
- Not use the same utensils on cooked food, that previously touched raw meat
- Wash hands after touching raw meat
- Don't leave food sitting out at room temperature for extended periods
- Never leave cooking food unattended
- Use oils with high smoking point to avoid harmful compounds
- Always have good ventilation when using a gas stove
For Canadian Guidelines check the Government of Canada Food Safety Guidelines or see more guidelines at USDA.gov.


Comments
No Comments